Recently when I was going through my CS50 course on edX, I was supposed to upload my assignment on github. Although I have been working as a test engineer for 3 years I never had a chance to work with git in a professional capacity. Also I wasn't much into programming. Nevertheless, better late than never right.
I use Ubuntu on my personal laptop and a huge open source fan so here on almost all the tutorials will be based on linux.

Git install in Ubuntu
sudo add-apt-repository ppa:git-core/ppa
sudo apt update
sudo apt install git
and hit yes and enter wherever it prompts.
make a directory in the path you choose
mkdir ~/Videos/newgitthis is a typical CLI (command line interface) command. Here your folder newgit will be created in the Videos folder.
go to the folder you created
cd ~/Videos/newgityou will notice that your terminal may show something like this
Configuring and Initializing your git
git config --global user.name yourusername
git config --global user.email your@email
this is done so that whatever commits or changes you do are displayed to others as its done by you. To verify if its done or nor use below commands
git config --global user.name
git config -- global user.email
Open VS code from the terminal :code (dot)
code . 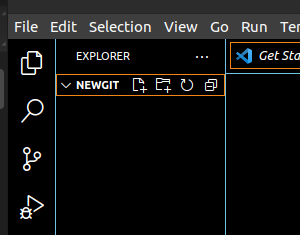
notice how the folder newgit is already opened in the file explorer. You can use the same format whenever you are working on VS code. go to the folder where you want to write your program with cd command and use code . you could also use notepad++ or atom in a similar way.
the cd command is used to change the working directory. Earlier we moved to newgit folder with below command. here ~ symbol called tilde is used to represent home/username folder.
cd ~/Videos/newgitInitializing a folder or repository
So far we have only installed git and configured it. Now you have two options, either you can clone a repository or init or initialize a local repository. Here repository simply means a folder containing coding stuff or any docs or anything. when you clone git transfers all the files from a global repository in github to a folder in your computer. But when you initialize, you are telling your git software that 'buddy please make a note of this folder coz this is where the shit will go down'. Now in this case our local repository is newgit. So lets tell git to make note of it by following commands after you have entered the folder with cd command.
git init
once you have done this, now lets verify by using the ls command to list the files. Assuming you are still in the same newgit folder. Run ls -lart

A .git folder is created. That means you are good to go.
Creating a simple HTML document
Now lets create a simple HTML page in the newgit folder by using VS code.


As you can see, a new HTML file is created. You can create as many files as you like.
Now lets learn how to actually work with git using this file. First of all you can check the files with ls command.
Checking the status of files in git repository and various stages.
Now lets see what git has to say about our new file. Run below command.
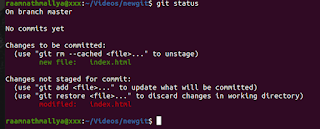
git status
Here you can notice few things.'on branch master', 'no commits yet' and 'untracked' lets learn more about them.

Here when you first write a file, It'll be in untracked condition. You can think of this as your regular text file that you have written but it is not saved yet. so computer doesn't know what to do with it and if you shutdown its lost. But here in index.html case its not lost exactly coz you have saved the file by ctrl+s in vs code. So what exactly is happening here? Here Untracked means your git software is unsure about the files. Whenever you ask a techie, what is git? The first answer you get is, its a version control software. What exactly is version control? Simply put, its a software that records changes that you do to a file over time so that may be in future if you want to revert the changes. You can! Unlike your ctrl+z on your word. But in order to do that, git needs to make note of your file.
Adding a file to staging area, restoring and committing.
Thats where untracked comes to play. Currently your file is not noticed by git. So you tell 'check out this file bro' by using the command shown in the snippet.
git add index.htmlNow it gets interesting. The file is not exactly saved yet! git just made a note of it. So now the file is in whats called a staging area. Now lets check the status again with git status

As you can notice the file is in green color. And says changes to be committed. When you first start a new project, its customary to hit commit once at the beginning. but for now lets simply edit the files again and see what happens.
here you can see kinda two versions of the file. One which was initially there and another new one your 'modified' version, where you did some changes.This is where the modified stage comes into play. Hence it says 'changes not staged..' if you read on you can see that git provides you with two other options. you can either update this new changes to your older version by git add index.html and stage it or simply restore it back to the older version git restore index.html which is already staged.
If you restore it to the older version by running the above command. you can actually see that the changes you have made to the file is now gone! You can check by simply going to vs code and see that file.
However lets stage it once and then commit. Now what commit does is that the file is not saved, proper proper!
git committhis will take you to another screen on your CLI which may look like this.

This is a nano editor. So what happened here is that git provides you with an option to write a comment about the changes you made to the file when you commit. This is kept in place so that in future when multiple people are working on the same file, the changes can be tracked and see who did what. Remember we initially configured the git with your username, this is where exactly it comes into play. now lets simply write some comment and go on. If you get the vim editor and it doesn't allow you to type, hit i and then type. to save the comment and exit the editor you need to hit esc and :wq I know its a bit much but that's why i installed nano :P
Once you have saved your comment if you check the git staus you can see 'working tree clean' that means git has saved everything!

you may play around a lil with what you have learnt so far. But i said earlier while creating index.html, you can create any number of files. So what if you went ahead and created some 20 odd files by using the following command touch about.html and touch contact.html Here the touch command creates empty files. How would you send them all at once to staging. here you use
git add -Athe -A option is for all the files. you can use it with say ls -a for listing all the files and so on too.
Keep hitting git status in between to know status of your files.
What if you don't wanna use any vim or nano editor when you commit? There you use below command.
git commit -m "this is my comment"
What if you are very sure of your code and want to commit without staging it? Then you use this command
git commit -a -m "commiting without staging"But this above command will fail if you try to commit a 'untracked' file. In that case you need to git add it first then subsequent changes can be committed directly.
Now lets say, your noughty neighbor kid just ran into your work and messed up the file!! how do you get that file back! Thats where this next command comes into play
git checkout contacts.htmlThe checkout command then reverts to the last committed version of your file. that way even if its messed up, you can still recover.

git checkout -fFor reverting all the files to previous commit state.
Logging all the commits and viewing the difference.
What if you want to see all the changes that you've done or your partners have done to the files over time? Here you check the logs.
git logsthis will return all the changes committed so far.

Notice the author and email and the comment. You now see the importance of the comments you enter when you commit. If there
are a lot of commits in your project you could use this command to filter them out to the latest commit log. the number denotes the number of latest logs you'd like to see.
git log -p -2here it will show the git diff output

So what exactly is git diff? the git diff command compares two stages or two versions of your code. for example, Say you made some changes in the index.html file. Now you want to see how that is different from what you have staged. so you simply run
git diffand it will show you the changes made.
We have already staged and commited the files. now lets edit one of the files.

lets check the status.

it is Modified right. lets run the
git diff
notice the green colour and + to denote that a new line is added.
Here when you use git diff it compares your working file with the staged file. What if you want to see the difference between your staged file and committed file?
git diff --staged
Here it is not showing any results coz there are no difference between them!
You are free to play around with this and see what will happen when the staged file is different than the committed file. Lets stage the changes made to index.html and then run the diff command to check the difference between staged and committed

now if you run
git diff it will be empty coz your working file matches the staged file.Removing a file
Back when we first saw the various stages, there was one arrow that said remove the file. Now lets see how to 'remove the file'. For this git provides a git rm command . This command will simply delete the file from your computer.
git rm waste.htmlBut if the file is staged then this will throw an error. Hence use -f like so, to force delete the file.
git rm -f waste.html
In this example above, I created an empty file called waste.html and then added it to staging area. Where i tried the rm command but it threw an error hence I forced to delete by option -f .
Sometimes when you have just created a file and try to delete it, It may throw an error as "did not match any files"

This is because the git has not made a note of the file yet. so you need to add it to staging area and then run the git rm -f filename command
But what if you have added it to the staging area earlier and now you want to remove it from the staging area. In that case you use this command.
git rm --cached waste.htmlHere in this case the file will be removed from the staging area But it won't be deleted from your local repository.

As you can see, the file is back in untracked file condition after it is removed from the staging area.
Git short status
So far we have been hitting git status a lot of times to keep track of things. Lets say you don't really wanna read all the stuff and just want what files are in untracked and modified or committed etc. then you can use below command.
git status -sthis will reduce the lines to bare minimum of lines. Lets say you have an untracked file called waste.html then it will look like this
Notice the red?? sign that is for untracked.
What if you add to the staging area, then how will the short status look like?

Notice the greenA before the waste.html that denotes the file is in staging area.
Now lets modify the file again and see if the status changes. This will cause difference in working file and staged file.

As you can see i have appended an new line and you can see a redM after green A that shows that there are changes in the working file and staged file.
if you simply commit and then run the short status. you won't find any thing coz the there is no status to display.

So what happened here is, i forgot to add the option -a so the git only committed the staged file and not the working file. Lets try to commit again wit -a option.

as you can see. it is indeed committed without being staged. However I highly suggest you to make use of the stage feature coz why not!
Notice there is nothing displayed when you ran the short status command.
Git ignoring files in your repository
Sometimes when you are writing a huge program some log files may get generated or some files you may have added for fun or anthing which you don't want git to add or commit. Lets face it, when you create multiple files you will run git add -a and not add individually. What happens then is, all the files that you don't want to be in staging area will be added too. So inorder to avoid that we use a simple functionality called git ignore
The way it works is, First of all you have to create a file called gitignore. And then add the filenames that you want git to ignore in that gitignore file. Lets dive into this and learn more.
Lets just create a simple file called gitignore

Here I have used a touch command to create an empty file called gitignore. but notice it is still displayed along with other html files. this gitignore is what you call something of a configuration file. it is not one of your program files. So what do we do? we could either put it in another folder called config or simply rename it to .gitignore the . specifies that the file is hidden. and won't show up in ls command. Unless of course you use ls -a etc. so lets do that

Notice i used a mv command to rename. Thats how we roll in CLI
Now that we have created the .gitignore file. Lets create some files to be ignored.

right now lets just add the .gitignore file to the staging area and then check the status again.

Well well well.. the log files are still showing up. Its coz we haven't added these file names in the .gitignore yet. So lets add that first and then add .gitignore to staging area and then see.
I use nano editor. you can use anything. even vscode.

added the filename process.log but not waste.log

as you can see only waste.log is in the untracked file and the process.log is ignored completely.

still the same.
So when you are programming sometimes there will be alot of files with same extention gets created and you may have to ignore that too. but you can't really add each filename one by one that is a tedious job. So what CLI has given us is a wildcard character. here * denotes all for example if you write *.log it represents all the files with .log extention. lets add that and see what happens.

I have added a *.log using nano editor and then checked the git status

Notice that even the waste.log file is ignored. Not only this, any .log file in any folder will also be ignored by addin *.log in the .gitignore file. But what if you want to ignore files from only a certain folder. and that there are multiple extentions etc. What if you made sure all the to be ignored files are in a folder called ignore or something . how to ignore that. Lets try that by adding a folder first.

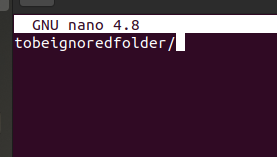
Here I have created a folder called tobeignoredfolder with mkdir command. You can see that it shows up in the list of files and folders. but doesn't show up in the git status. (please don't mind the .gitignore file in the staged and working file condition. It is from the previous demonstration. I will add it shortly) This is because that folder is empty. Lets add some files in it.

So I added the .gitignore file to staging area like i said i would do first. Then i Used the touch command to create empty files. Here notice i used some ./ to denote path of the file. ./ simply means in this directory or in this folder. you can either simply go to the folder using cd tobeignoredfolder and then use the touch filename.extension Or do like what i did.
Lets add this folder to the .gitignore file

keep checking the git status
there are untracked files in the tobeignoredfolder
and other log files are ignored(waste.log and process.log).
I have erased the older entries of *.log and process.log. Hence they will not be ignored by git. But since i have added the folder in the .gitignore file, all the files in the tobeignoredfolder will be ignored.

Notice the folder is not showing up in the git status which means that this folder is considered empty ergo the files in it are ignored.
Git Branches
Apart from stage feature of the git. Probably one of the best feature of the GIT is the branches. You may have heard this from techies who use terms such as merge the branch etc. Lets look into this . So Far whenever you added a new file or created a folder everything was happening in the master branch as evident from all the git status results. Keeps saying on branch master.
Suppose, you want to add some new feature to the existing set of codes but you are not sure of it Or simply want to try out new stuff without bothering the existing line of codes. Normally without git you would copy em into a new folder and then do the changes aaand the headache you get.

In git, you can simply create a new branch containing the same set of codes from the existing main branch. More like a copy of it and then work on this new branch. you can add new files to it or modify existing files and then finally when you are completed you can merge with the master branch seemlessly. Generally when you are working in a organisation, you need to get the new changes reviewed and approved before you merge into the master branch. this is done to avoid any breakdown of the system as the master branch is the one which will be running in real time.
now lets create a new branch and add new files to it, change some lines from existing code from master branch.
git branch Lets you see all the branches you have created.
git branch newfeaturecreates a new branch called newfeature
git checkout newfeatureThis command lets you enter the branch newfeature that you have created.
What if you are in a hurry and want to create and enter a new branch with a single line and not two commands like we did so far.
git checkout -b anotherfeatureLets use all these commands and create some branches.

Lets add some lines as a new feature in index.html under newfeature branch and commit it.


As you can clearly see the index.html file in the newfeature branch is different than that of master branch.
Lets try and add some new files to the another feature branch and see how that works out.
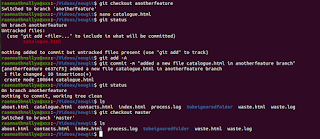
In the above example we have created a new file called catalogue.html under anotherfeature branch and committed it. Then you can see the file is visible under ls command. But when you move to the master branch and then see the ls command that same catalogue.html is not available. This is because, that file is part of anotherfeature branch and hence only visible and allowed to work on when you are in anotherfeature branch.
Git Merge branch
Now that you have finished working on your newfeatures and need to merge one of the branches for example you'd like to merge the another feature branch. Then you can do that with
git merge yourbranchname
And now you have merged your newbranch with the master branch and added new functionality no less ;)
What is github and how to use it?
So far we have worked on our computer locally with the git. We installed the software and then worked on it. But what about github? what is that all about ?are these two related? Lets look into it

Github is a platform to host your repositories online.
So far you have created a repositrory locally on your computer and worked on it. Lets say you want your buddies to collaborate on this project of yours. You do this with github. You simply upload or push your local master branch on to github repository and allow your buddies to work on it as well.
Right now github allows us to have unlimited repositories and max 3 collaborators on a free option. you can choose this and continue. As a software developer, you gotta have a github account. Its that place where you showcase what you have worked on or work on your side project or help other open source project or simply clone an existing repository and tweak its source code to suit your needs. You can do all sorts of fun stuff with these.
Using github online GUI
Now lets see how to push our newgit repository online on github.
First of all create an account and login.
One thing to note here is that if you haven't had a previous account make sure when you create a new account you use the same username and email that you provided when you first did the config at the beginnig using git config --global user.name yourusername

Click on the + icon and select new repository.
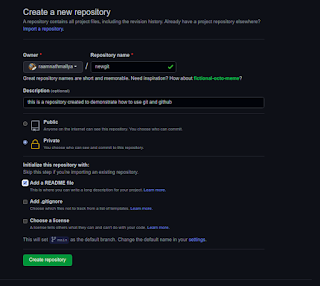
add the repository name
select private for now, but if you want others to see it then you can make it public.
select add a readme file. this will allow you to have a text document explaining what you are doing with this project.
Hit create repository

Accessing github from CLI on your computer
Inorder to be able to work on your computer locally and be able to push to the github, you need a connection between your CLI and your account online. Now that repository you just created online is called remote repository.
git remote add origin https://github.com/raamnathmallya/newgit.githere the git adds the remote repostitory from the URL and names it as origin. You can name it as anything you like. from now on i will call this remote repository URL as origin.
Lets try to push our master that we have created so far into the remote repository.

In the above snippet you can see i have added the remote repository that i created online called newgit and called it origin on my CLI. with git remote -v you can see the fetch and push URL too.
But we are facing an error while we try to push. Lets try to fix that issue.
You can simply go to the link given in the error message to read more about the issue.
Pushing your code in master branch to online github repository.
For now go to the Settings > Developer settings > Personal access tokens
Here click on generate new token
You need to add a note to identify this token and select the permission to access.
once you hit the generate token , some alpha numeric key will be generated.
You need to copy that key
then on the terminal type
git push origin masterthis will prompt you to enter the username, give your username.
For the password, do not enter the password of your github account. it will throw the same error. Instead paste the alpha numeric token that you copied from the settings. And there you have it.
if you use git push -u origin master then your subsequent pushes will be added to master branch with simply git push command.

Then you come to the home page and select that repository you have just created. In my case its newgit.

Here you select the branch you need to see and then .. there you have it.

Pushing other branches to github
Now, we have created two more branches called newfeature and anotherfeature Lets try and add them and see if it works the same way.

Here again, use the token instead of password.

and that is how you push your code to github.
Cloning a repository in github
lets say you'd like to work on some existing source code independently. Then in that case you can clone the repository to your local repository. Simply put, you will be downloading the source code to a folder in your computer.git clone URL foldername
lets create a folder and clone a repository in it.

found something called sindresorhus/awesome
lets clone this.

Click the green button that says code. and copy the url.

we created a folder called clonesample under videos and added the clone to a folder called awesome in it.

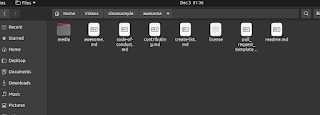
aand there you have it.
So far we have covered almost all of basic git functions and how to use them from the terminal. Let me know what you if you have any doubts in the comments below.
I am a newbie. and I just started using GIT and thought i will make a detailed notes of all the functionalities that we may need during day to day operations.
I have created a new cheat sheet with all the commands we have discussed so far.
I haven't added the pull request part yet. next time when i work on it I will add that part as well. Until then..
wagmi
No comments:
Post a Comment